auth0/Auth0.swift
Auth0 SDK for Apple platforms
Documentation
- shows how to integrate Auth0.swift into an iOS / macOS app from scratch.
- Sample App - a complete, running iOS / macOS app you can try.
- API Documentation - documentation auto-generated from the code comments that explains all the available features.
+ Web Auth + Credentials Manager + Authentication API Client + MFA API Client + Management API Client (Users)
- FAQ - answers some common questions about Auth0.swift.
- Auth0 Documentation - explore our docs site and learn more about Auth0.
Getting Started
### Requirements
- iOS 14.0+ / macOS 11.0+ / tvOS 14.0+ / watchOS 7.0+ / visionOS 1.0+
- Xcode 16.x
- Swift 6.0+
> [!IMPORTANT]
> Check the [Support Policy](#support-policy) to learn when dropping Xcode, Swift, and platform versions will not be considered a **breaking change**.
### Installation
#### Using the Swift Package Manager
Open the following menu item in Xcode:
**File > Add Package Dependencies...**
In the **Search or Enter Package URL** search box enter this URL:
```text
https://github.com/auth0/Auth0.swift
```
Then, select the dependency rule and press **Add Package**.
#### Using Cocoapods
Add the following line to your `Podfile`:
```ruby
pod 'Auth0', '~> 2.18'
```
Then, run `pod install`.
#### Using Carthage
Add the following line to your `Cartfile`:
```text
github "auth0/Auth0.swift" ~> 2.18
```
Then, run `carthage bootstrap --use-xcframeworks`.
### Configure the SDK
Head to the [Auth0 Dashboard](https://manage.auth0.com/#/applications/) and create a new **Native** application.
Auth0.swift needs the **Client ID** and **Domain** of the Auth0 application to communicate with Auth0. You can find these details in the settings page of your Auth0 application. If you have a [custom domain](https://auth0.com/docs/customize/custom-domains), use your custom domain instead of the value from the settings page.
> [!IMPORTANT]
> Make sure that the Auth0 application type is **Native**. Otherwise, you might run into errors due to the different configuration of other application types.
#### Configure the Client ID and Domain with a plist
Create a `plist` file named `Auth0.plist` in your app bundle with the following content:
```xml
<?xml version="1.0" encoding="UTF-8"?>
<!DOCTYPE plist PUBLIC "-//Apple//DTD PLIST 1.0//EN" "http://www.apple.com/DTDs/PropertyList-1.0.dtd">
<plist version="1.0">
<dict>
<key>ClientId</key>
<string>YOUR_AUTH0_CLIENT_ID</string>
<key>Domain</key>
<string>YOUR_AUTH0_DOMAIN</string>
</dict>
</plist>
```
#### Configure the Client ID and Domain programmatically
<details>
<summary>For Web Auth</summary>
```swift
Auth0
.webAuth(clientId: "YOUR_AUTH0_CLIENT_ID", domain: "YOUR_AUTH0_DOMAIN")
// ...
```
</details>
<details>
<summary>For the Authentication API client</summary>
```swift
Auth0
.authentication(clientId: "YOUR_AUTH0_CLIENT_ID", domain: "YOUR_AUTH0_DOMAIN")
// ...
```
</details>
<details>
<summary>For the Management API client (Users)</summary>
```swift
Auth0
.users(token: credentials.accessToken, domain: "YOUR_AUTH0_DOMAIN")
// ...
```
</details>
### Configure Web Auth (iOS / macOS)
#### Configure the callback and logout URLs
The callback and logout URLs are the URLs that Auth0 invokes to redirect back to your app. Auth0 invokes the callback URL after authenticating the user, and the logout URL after removing the session cookie.
Since callback and logout URLs can be manipulated, you will need to add your URLs to the **Allowed Callback URLs** and **Allowed Logout URLs** fields in the settings page of your Auth0 application. This will enable Auth0 to recognize these URLs as valid. If the callback and logout URLs are not set, users will be unable to log in and out of the app and will get an error.
Go to the settings page of your [Auth0 application](https://manage.auth0.com/#/applications/) and add the corresponding URLs to **Allowed Callback URLs** and **Allowed Logout URLs**, according to the platform of your app. If you have a [custom domain](https://auth0.com/docs/customize/custom-domains), replace `YOUR_AUTH0_DOMAIN` with your custom domain instead of the value from the settings page.
> [!NOTE]
> On iOS 17.4+ and macOS 14.4+ it is possible to use Universal Links as callback and logout URLs. When enabled, Auth0.swift will fall back to using a custom URL scheme on older iOS / macOS versions.
>
> Whenever possible, Auth0 recommends using Universal Links as a secure way to link directly to content within your app. Custom URL schemes can be subject to [client impersonation attacks](https://datatracker.ietf.org/doc/html/rfc8252#section-8.6).
>
> **This feature requires Xcode 15.3+ and a paid Apple Developer account**.
##### iOS
```text
https://YOUR_AUTH0_DOMAIN/ios/YOUR_BUNDLE_IDENTIFIER/callback,
YOUR_BUNDLE_IDENTIFIER://YOUR_AUTH0_DOMAIN/ios/YOUR_BUNDLE_IDENTIFIER/callback
```
##### macOS
```text
https://YOUR_AUTH0_DOMAIN/macos/YOUR_BUNDLE_IDENTIFIER/callback,
YOUR_BUNDLE_IDENTIFIER://YOUR_AUTH0_DOMAIN/macos/YOUR_BUNDLE_IDENTIFIER/callback
```
<details>
<summary>Example</summary>
If your iOS bundle identifier were `com.example.MyApp` and your Auth0 Domain were `example.us.auth0.com`, then this value would be:
```text
https://example.us.auth0.com/ios/com.example.MyApp/callback,
com.example.MyApp://example.us.auth0.com/ios/com.example.MyApp/callback
```
</details>
#### Configure an associated domain
> [!IMPORTANT]
> This step requires a paid Apple Developer account. It is needed to use Universal Links as callback and logout URLs.
> Skip this step to use a custom URL scheme instead.
##### Configure the Team ID and bundle identifier
Scroll to the end of the settings page of your Auth0 application and open **Advanced Settings > Device Settings**. In the **iOS** section, set **Team ID** to your [Apple Team ID](https://developer.apple.com/help/account/manage-your-team/locate-your-team-id/), and **App ID** to your app's bundle identifier.
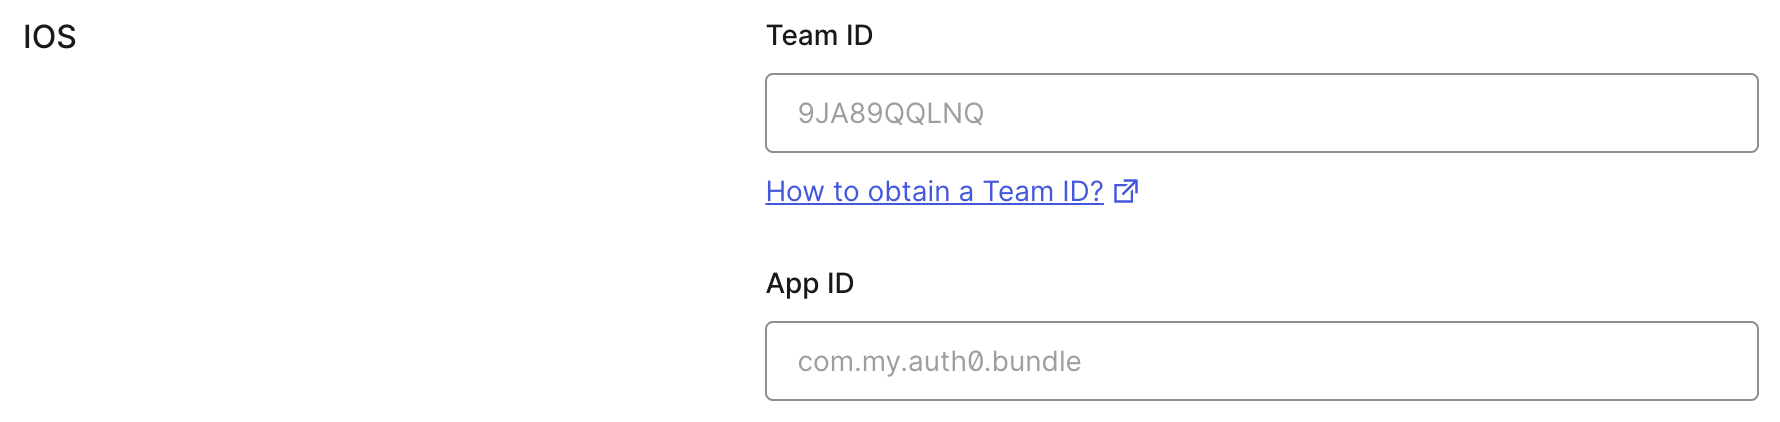
This will add your app to your Auth0 tenant's `apple-app-site-association` file.
##### Add the associated domain capability
In Xcode, go to the **Signing and Capabilities** [tab](https://developer.apple.com/documentation/xcode/adding-capabilities-to-your-app#Add-a-capability) of your app's target settings, and press the **+ Capability** button. Then select **Associated Domains**.
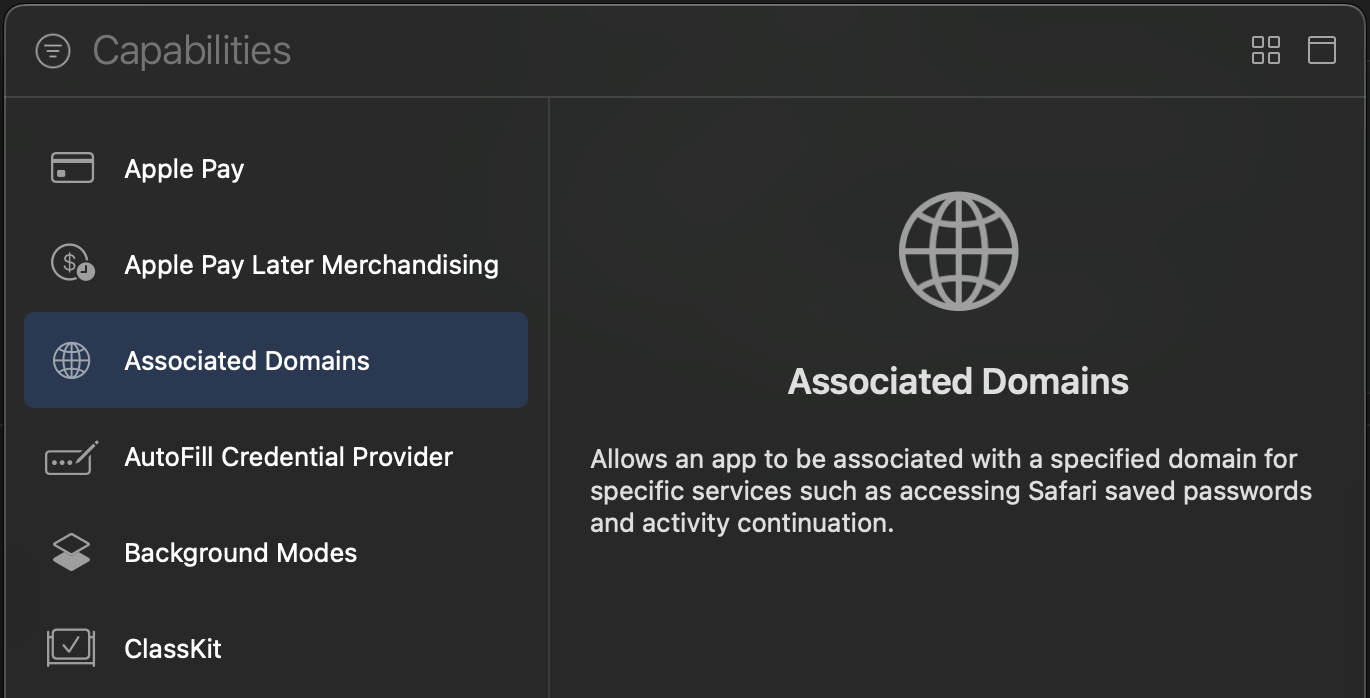
Next, add the following [entry](https://developer.apple.com/documentation/xcode/configuring-an-associated-domain#Define-a-service-and-its-associated-domain) under **Associated Domains**:
```text
webcredentials:YOUR_AUTH0_DOMAIN
```
<details>
<summary>Example</summary>
If your Auth0 Domain were `example.us.auth0.com`, then this value would be:
```text
webcredentials:example.us.auth0.com
```
</details>
If you have a [custom domain](https://auth0.com/docs/customize/custom-domains), replace `YOUR_AUTH0_DOMAIN` with your custom domain.
> [!NOTE]
> For the associated domain to work, your app must be signed with your team certificate **even when building for the iOS simulator**. Make sure you are using the Apple Team whose Team ID is configured in the settings page of your Auth0 application.
### Web Auth login (iOS / macOS)
Import the `Auth0` module in the file where you want to present the login page.
```swift
import Auth0
```
Then, present the [Universal Login](https://auth0.com/docs/authenticate/login/auth0-universal-login) page in the action of your **Login** button.
```swift
Auth0
.webAuth()
.useHTTPS() // Use a Universal Link callback URL on iOS 17.4+ / macOS 14.4+
.start { result in
switch result {
case .success(let credentials):
print("Obtained credentials: \(credentials)")
case .failure(let error):
print("Failed with: \(error)")
}
}
```
<details>
<summary>Using async/await</summary>
```swift
do {
let credentials = try await Auth0.webAuth().useHTTPS().start()
print("Obtained credentials: \(credentials)")
} catch {
print("Failed with: \(error)")
}
```
</details>
<details>
<summary>Using Combine</summary>
```swift
Auth0
.webAuth()
.useHTTPS() // Use a Universal Link callback URL on iOS 17.4+ / macOS 14.4+
.start()
.sink(receiveCompletion: { completion in
if case .failure(let error) = completion {
print("Failed with: \(error)")
}
}, receiveValue: { credentials in
print("Obtained credentials: \(credentials)")
})
.store(in: &cancellables)
```
</details>
### Web Auth logout (iOS / macOS)
Logging the user out involves clearing the Universal Login session cookie and then deleting the user's credentials from your app.
Call the `clearSession()` method in the action of your **Logout** button. Once the session cookie has been cleared, [delete the user's credentials](EXAMPLES.md#clear-stored-credentials).
```swift
Auth0
.webAuth()
.useHTTPS() // Use a Universal Link logout URL on iOS 17.4+ / macOS 14.4+
.clearSession { result in
switch result {
case .success:
print("Session cookie cleared")
// Delete credentials
case .failure(let error):
print("Failed with: \(error)")
}
}
```
<details>
<summary>Using async/await</summary>
```swift
do {
try await Auth0.webAuth().useHTTPS().clearSession()
print("Session cookie cleared")
// Delete credentials
} catch {
print("Failed with: \(error)")
}
```
</details>
<details>
<summary>Using Combine</summary>
```swift
Auth0
.webAuth()
.useHTTPS() // Use a Universal Link logout URL on iOS 17.4+ / macOS 14.4+
.clearSession()
.sink(receiveCompletion: { completion in
switch completion {
case .finished:
print("Session cookie cleared")
// Delete credentials
case .failure(let error):
print("Failed with: \(error)")
}
}, receiveValue: {})
.store(in: &cancellables)
```
</details>
### SSO alert box (iOS / macOS)

Check the [FAQ](FAQ.md) for more information about the alert box that pops up **by default** when using Web Auth.
> [!NOTE]
> See also [this blog post](https://developer.okta.com/blog/2022/01/13/mobile-sso) for a detailed overview of single sign-on (SSO) on iOS.Examples
Explore common use cases and integration patterns for Auth0.swift.

> [!NOTE]
> **For comprehensive guides:** See the [**Examples documentation**](EXAMPLES.md) for in-depth tutorials on biometric authentication, passkeys, passwordless login, DPoP, and more. ✨

### Store credentials

When your users log in, store their credentials securely in the Keychain.

```swift
let credentialsManager = CredentialsManager(authentication: Auth0.authentication())
let didStore = credentialsManager.store(credentials: credentials)
```

### Retrieve stored credentials

Retrieve the stored credentials from the Keychain. If the credentials have expired, they will be automatically renewed using the refresh token.

```swift
credentialsManager.credentials { result in
    switch result {
    case .success(let credentials):
        print("Obtained credentials: \(credentials)")
    case .failure(let error):
        print("Failed with: \(error)")
    }
}
```

<details>
  <summary>Using async/await</summary>

```swift
do {
    let credentials = try await credentialsManager.credentials()
    print("Obtained credentials: \(credentials)")
} catch {
    print("Failed with: \(error)")
}
```
</details>

### Clear stored credentials

The stored credentials can be removed from the Keychain by using the `clear()` method.

> [!NOTE]
> It is recommended to call `clear()` when the user logs out of the application to remove their credentials from the Keychain.

```swift
let credentialsManager = CredentialsManager(authentication: Auth0.authentication())
let didClear = credentialsManager.clear()
```

### Retrieve user information

Fetch the latest user information from the `/userinfo` endpoint.

```swift
Auth0
   .authentication()
   .userInfo(withAccessToken: credentials.accessToken)
   .start { result in
       switch result {
       case .success(let user):
           print("Obtained user: \(user)")
       case .failure(let error):
           print("Failed with: \(error)")
       }
   }
```

<details>
  <summary>Using async/await</summary>

```swift
do {
    let user = try await Auth0
        .authentication()
        .userInfo(withAccessToken: credentials.accessToken)
        .start()
    print("Obtained user: \(user)")
} catch {
    print("Failed with: \(error)")
}
```
</details>

### Multi-factor authentication

> [!IMPORTANT]
> Multi Factor Authentication support via SDKs is currently in Early Access. To request access to this feature, contact your Auth0 representative.

Implement multi-factor authentication (MFA) flows using the MFA API. This includes enrolling MFA factors, challenging enrolled factors, and verifying MFA codes.

> [!NOTE]
> For complete MFA implementation examples including SMS, email, OTP, and push notifications, see the [**MFA section in EXAMPLES.md**](EXAMPLES.md#mfa-api-ios--macos--tvos--watchos--visionos).

#### Handle MFA required errors

When MFA is required during login, extract the MFA token and available factors from the error to proceed with the MFA flow.

```swift
Auth0
    .authentication()
    .login(usernameOrEmail: "support@auth0.com",
           password: "secret-password",
           realmOrConnection: "Username-Password-Authentication")
    .start { result in
        switch result {
        case .success(let credentials):
            print("Obtained credentials: \(credentials)")
        case .failure(let error) where error.isMultifactorRequired:
            if let mfaPayload = error.mfaRequiredErrorPayload {
                let mfaToken = mfaPayload.mfaToken
                print("MFA token: \(mfaToken)")

                // Check available factors for enrollment or challenge
                if let enrollTypes = mfaPayload.mfaRequirements.enroll {
                    print("Available for enrollment: \(enrollTypes.map { $0.type })")
                }
                if let challengeTypes = mfaPayload.mfaRequirements.challenge {
                    print("Available for challenge: \(challengeTypes.map { $0.type })")
                }
            }
        case .failure(let error):
            print("Failed with: \(error)")
        }
    }
```

<details>
  <summary>Using async/await</summary>

```swift
do {
    let credentials = try await Auth0
        .authentication()
        .login(usernameOrEmail: "support@auth0.com",
               password: "secret-password",
               realmOrConnection: "Username-Password-Authentication")
        .start()
    print("Obtained credentials: \(credentials)")
} catch let error as AuthenticationError where error.isMultifactorRequired {
    if let mfaPayload = error.mfaRequiredErrorPayload {
        let mfaToken = mfaPayload.mfaToken
        print("MFA token: \(mfaToken)")

        if let enrollTypes = mfaPayload.mfaRequirements.enroll {
            print("Available for enrollment: \(enrollTypes.map { $0.type })")
        }
        if let challengeTypes = mfaPayload.mfaRequirements.challenge {
            print("Available for challenge: \(challengeTypes.map { $0.type })")
        }
    }
} catch {
    print("Failed with: \(error)")
}
```
</details>

#### Enroll an OTP authenticator

Enroll a time-based one-time password (TOTP) authenticator app like Google Authenticator or Authy.

```swift
Auth0
    .mfa()
    .enroll(mfaToken: mfaToken)
    .start { result in
        switch result {
        case .success(let challenge):
            // Display QR code to user
            if let barcodeUri = challenge.barcodeUri {
                print("QR Code URI: \(barcodeUri)")
            }
            if let secret = challenge.secret {
                print("Secret: \(secret)")
            }
        case .failure(let error):
            print("Failed with: \(error)")
        }
    }
```

<details>
  <summary>Using async/await</summary>

```swift
do {
    let challenge = try await Auth0.mfa().enroll(mfaToken: mfaToken).start()
    if let barcodeUri = challenge.barcodeUri {
        print("QR Code URI: \(barcodeUri)")
    }
} catch {
    print("Failed with: \(error)")
}
```
</details>

#### Verify an OTP code

Complete the MFA authentication by verifying the OTP code from the user's authenticator app.

```swift
Auth0
    .mfa()
    .verify(otp: "123456", mfaToken: mfaToken)
    .start { result in
        switch result {
        case .success(let credentials):
            print("Obtained credentials: \(credentials)")
        case .failure(let error):
            print("Failed with: \(error)")
        }
    }
```

<details>
  <summary>Using async/await</summary>

```swift
do {
    let credentials = try await Auth0
        .mfa()
        .verify(otp: "123456", mfaToken: mfaToken)
        .start()
    print("Obtained credentials: \(credentials)")
} catch {
    print("Failed with: \(error)")
}
```
</details>
Support Policy
This Policy defines the extent of the support for Xcode, Swift, and platform (iOS, macOS, tvOS, and watchOS) versions in Auth0.swift.
Xcode
The only supported versions of Xcode are those that can be currently used to submit apps to the App Store. Once a Xcode version becomes unsupported, dropping it from Auth0.swift will not be considered a breaking change, and will be done in a minor release.
Swift
The minimum supported Swift minor version is the one released with the oldest-supported Xcode version. Once a Swift minor becomes unsupported, dropping it from Auth0.swift will not be considered a breaking change, and will be done in a minor release.
Platforms
We support only the last four major versions of any platform, including the current major version.
Once a platform version becomes unsupported, dropping it from Auth0.swift will not be considered a breaking change, and will be done in a minor release. For example, iOS 14 will cease to be supported when iOS 18 gets released, and Auth0.swift will be able to drop it in a minor release.
In the case of macOS, the yearly named releases are considered a major platform version for the purposes of this Policy, regardless of the actual version numbers.
Feedback
Contributing
We appreciate feedback and contribution to this repo! Before you get started, please see the following:
- Auth0's general contribution guidelines
- Auth0's code of conduct guidelines
- Auth0.swift's contribution guide
Raise an issue
To provide feedback or report a bug, please raise an issue on our issue tracker.
Vulnerability reporting
Please do not report security vulnerabilities on the public GitHub issue tracker. The Responsible Disclosure Program details the procedure for disclosing security issues.
<p align="center"> <picture> <source media="(prefers-color-scheme: light)" srcset="https://cdn.auth0.com/website/sdks/logos/auth0_light_mode.png" width="150"> <source media="(prefers-color-scheme: dark)" srcset="https://cdn.auth0.com/website/sdks/logos/auth0_dark_mode.png" width="150"> <img alt="Auth0 Logo" src="https://cdn.auth0.com/website/sdks/logos/auth0_light_mode.png" width="150"> </picture> </p>
<p align="center">Auth0 is an easy-to-implement, adaptable authentication and authorization platform. To learn more check out <a href="https://auth0.com/why-auth0">Why Auth0?</a></p>
<p align="center">This project is licensed under the MIT license. See the <a href="./LICENSE"> LICENSE</a> file for more info.</p>
Package Metadata
Repository: auth0/Auth0.swift
Homepage: https://auth0.github.io/Auth0.swift
Stars: 444
Forks: 261
Open issues: 8
Default branch: master
Primary language: swift
License: MIT
Topics: auth0, authentication, carthage, cocoapods, dx-sdk, ios, jwt, oauth2, sdk, swift
README: README.md